An Easy Guide To Use The ColdCard Bitcoin Hardware Wallet
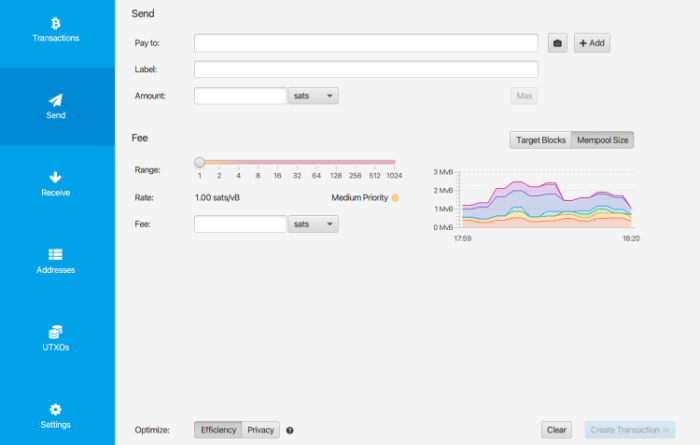
This is an opinion editorial by Arman The Parman, a Bitcoin educator passionate about privacy and contributor to Bitcoin Magazine.Make sure you go through the other piece “Using Bitcoin Hardware Wallets” first. I will glance some steps and focus primarily on what specifies to ColdCard here.This guide will be proper for the ColdCard MK3 and the more recent Mk4.PurchasingBuy the device directly from the manufacturer, Coinkite. This is mandatory; dont buy from Amazon, Ebay or used, to remove the possibility of tampering by a fraudster who might later on try to steal your bitcoin. Youll require to get a micro SD card too (the tiniest and least expensive will do) and for this Amazon is most likely your cheapest option (or in your area and quicker, Walmart or Target, etc, likewise usually bring them). Youll require a connection cable television too, as one does not featured the gadget. You may have one lying around from an old phone, or just purchase one.The Coldcard Mk4 has a USB-C connection connected to the shell, and the Mk3 has a micro USB connection. You require to source your own USB cable that matches the gadget and your computers USB port type.USB-C, Mk4; BELOW: micro USB, Mk3For example, if you use a modern-day Mac, itll have USB-C ports like the ColdCard does, and youll need a cable like this: For the Mk3 ColdCard and a computer with regular USB ports, youll require a cable television with micro USB and routine USB, like this: In addition to the cable television, youll require a 5-volt charger, like the ones most phones utilize. You can connect your wallet to the computer system for power, however we desire to prevent that if we can, for ideal security.When you put your order with Coinkite, ideally you should not deliver it to your house address, as the packaging (readily available to see by the whole delivery circulation chain) states that the content is a “ColdCard calculator.” You dont desire to reveal to the world that you own bitcoin, and where you live. So, use a fake name, and ship it to your location of work, or a P.O. Box. This is finest practice, however probably not a destructive error if you do not. Establishing The ColdCardWhen the device shows up from Canada, ensure you examine the tamper-evident bag for any disturbance/compromise. There is likewise a number on the bag– keep it, as the gadget will require you to compare that number with a number the gadget offers from its memory, to guarantee you are getting the proper gadget, and not a swapped one.Power on the gadget, and checked out whatever the gadget presents to you carefully. The keypad has arrows; utilize them to scroll down to the bottom of all messages. In some cases at the end of a message, it will get you to push a particular number to show you read the message. If you didnt read that and pushed the checkmark to continue, youll loop back to the start and youll believe the device is faulty.Youll be provided directions to set a PIN. The naming of the PIN is regrettable and a bit confusing, and Ill describe. There are two PINs in reality. When you turn on your device, youll be getting in PIN-1. You will then exist with two “phishing” words that are unique to your gadget. The words will be the same every time, and you just require to validate you recognise those words. Recognising the words verifies you put the right PIN-1, and that the device is really yours and hasnt been switched without your knowledge. When you know the gadget is yours, the next timely is to enter PIN-2. The ColdCard device calls PIN-1 the PIN prefix, and when triggered for PIN-2, it says “enter rest of PIN.”When setting PIN-1 or PIN-2, you can choose 2-6 digits for each PIN.You will then be presented with the option to produce a new wallet or “import existing” (restore a wallet). I will go through developing a brand-new wallet. The device will provide you 24 words, one at a time. Compose them down in order, and after that youll be asked to validate the words. Simply resolve the prompts. Keep in mind to make a replicate of these words, and save the two copies in various areas to avoid overall loss from a catastrophe such as a fire.Once you are ended up, the gadget will show you the top menu which checks out “Ready to Sign.” You can then detach the gadget. Reconnect and make sure you master turning it on and entering your PIN numbers.About PassphrasesA “wallet” has a number of meanings. Here Im utilizing it to explain the distinct collection of 2 ^ 32 addresses that come from theseed phrase (words)plus passphrase (your choice of text as much as 100 characters)plus derivation pathThose three things, when combined, produce a “wallet”– > roughly 4.3 billion addresses each with a private key.Dont concern excessive about the derivation course; in a manner, it acts like a second passphrase, and users must just leave this as a default, generally, m/84/ 0/ 0 ′; even innovative users shouldnt edit these in my opinion. If during any wallet creation procedure, the derivation path exists to you, it is great practice to write it down, although if lost and you never ever changed it, it will not be too difficult to recuperate the “default” numbers.Every time you switch on the ColdCard, you will have access to the 4.3 billion addresses that belong to the seed (no passphrase). You can use any passphrase you desire (100 character limitation) and when you do, the ColdCard forgets the initial 4.3 billion address from its short-lived memory (it only holds one collection of addresses at a time), and you get a fresh new set of addresses (a wallet) that belong to the initial seed expression plus the passphrase you chose.When you switch off the gadget, all wallets vanish from memory (however not the seed obviously). Youll be back to the original wallet with seed plus no passphrase when you turn it on. To get your passphrase wallet back, you need to apply the passphrase once again. In this way, you can have limitless wallets (each with 4.3 billion addresses) that are obtained from a single seed phrase (which you backed up). If you ever lose the device, you can merely buy another (and even among a different brand if you pick), restore the seed you have kept safe, and youll get your initial wallet back. You can then apply any passphrase to get your passphrase wallets back (and the bitcoin in them naturally). Your bitcoin is not bound to the ColdCard gadget, it is bound to the BIP-39 (Bitcoin Improvement Proposal 39) procedure. You can find out more about this procedure by following the directions of this enjoyable exercise.To use a passphrase, go to the passphrase menu, and select “modify expression.” The 1, 2 or 3 buttons permit you to alter the kind of signs to select from. Use the up and down arrow to select the sign, then use the left and right arrows to move the cursor to the position you wish to modify. When ended up, click the checkmark. However thats not it, you still require to “apply” the passphrase to memory. Scroll to the bottom and select “use.” Read the message. If your micro SD card is placed, youll have the alternative to conserve the passphrase to the card to avoid this tiresome procedure of typing the passphrase, but be conscious you are recording delicate information on the card and require to keep it secure.When turning on the gadget at a later time, to get your passphrase wallet, you go to the passphrase menu. If your micro SD card is placed, you can pick “bring back saved.” If not, you need to repeat the above treatment (edit phrase, and after that apply). Remember if you ever want to “export” a wallet from the gadget to make a viewing wallet (dont worry if you do not understand what that implies in the meantime), you require to have the appropriate wallet in memory at the time you make the export; either the wallet with no passphrase or a wallet from one of your passphrases.Watching WalletIn previous articles, I explained how to verify and download Sparrow wallet, and how to link it to your own node, or a public node. This is outside the scope of this guide, however you can follow these guides if interested. Otherwise, just check out on.Install Bitcoin CoreInstall Sparrow Bitcoin WalletConnect Sparrow Bitcoin Wallet to Bitcoin CoreAn option to utilizing Sparrow bitcoin wallet is Electrum desktop wallet, however I will continue to discuss Sparrows bitcoin wallet as I evaluate it to be the very best for the majority of people. Advanced users might like to utilize Electrum as an alternative.To install Sparrow, follow the “Install Sparrow Bitcoin Wallet” link above and then return here.Run Sparrow WalletThis pop-up can be deceiving. Read it effectively. The “offline” button and toggle is an image just, i.e., you cant in fact connect with it (individuals have actually tried!). Just click the next button.Again, that yellow toggle is an image just. Read and click “Next.” And the very same with the next two pop-ups, until you see this: Here we are about to link to a public server that comes from Emzy. Emzy is a great man and I would not challenge linking to his node, although best practice (which you can ultimately pursue) is to link to your own node. Click the “Test Connection” button to ensure you can connect to Emzys node.Then you can click the giant blue “General” tab left wing: All of this can be left as defaults. Proceed and choose “Create New Wallet.”Name it something pretty: Then click “Create Wallet”We can set up all sorts of wallets from here. I will show two methods, one with the ColdCard directly linked by cable to the computer system (this is fine, however theoretically not as good as the next approach). The other is the more cumbersome way, i.e., air-gapped. With CableGo ahead and connect the ColdCard to the computer and get in the PIN. Then use the passphrase if you want that.Then click the “Connect Hardware Wallet” button.Then click “Scan” … Sparrow ought to discover your device. Some troubleshooting if you fail at this step: Make sure you have proceeded past the PIN-entering phase on the device.If you previously linked the gadget to another wallet, reconnecting and disconnecting might be necessary to “forget” the old connection.Make sure the USB alternative is not shut off in the ColdCard settings.Now we exist with some details about the wallet. You can copy the xpub or zpub to a file– this will allow you to bring back the wallet (however no costs capability)– sort of like having the ability to access your bank account online however as an observer only. The xpub is still sensitive, but just not as much as the seed words and passphrase. Keep in mind the computer system does not know the seed expression: that is kept hidden in the ColdCard, its main task. Click “Apply” to proceed.A copy of the watching wallet is going to be made on the computer and this will encrypt it. Dont confuse “password” with “passphrase.”Once the computer system does its thinking, all the blue buttons left wing are available to you. You can click “Addresses” now and see your wallet. Despite the fact that you have 4.3 billion addresses, only the first numerous are shown. By the way, you also have 4.3 billion change addresses, so I should have stated earlier that each wallet has 8.6 billion unique addresses.ReceivingTo receive some bitcoin, go to the Addresses tab on the left and choose among the addresses to get. Simply right-click the address you desire, and select “Copy Address.” Go to your exchange where the cash is being sent out from and paste it there. Or you may provide the address to a customer who can use it to pay you.When you utilize the wallet for the very first time, you must receive an extremely percentage, practice sending it to another address, either within the wallet or back to the exchange, to show that the wallet is working as expected.Once you do that, you must support the words that you composed down. As discussed previously, a single copy is insufficient. Have two paper copies at least (metal is much better), and keep them in 2 various, well-secured, areas. See “Using Bitcoin Hardware Wallets” for a complete conversation on this.SendingWhen making a payment, you need to paste in the address you are paying to in the “Pay to” field. Go into the quantity and you can also by hand adapt to the cost you want.The wallet can not sign the transaction unless the ColdCard is connected. Thats the job of the hardware wallet– to get the transaction, sign it, and provide it back, signed. Ensure when you sign on the device, you aesthetically check the address you are paying to is the exact same on the device and on the computer system screen, and the invoice you receive (e.g., you may have received an email to pay a particular address). Pay attention that if you pick to use a coin that is larger than the payment quantity, then the rest will be sent back to one of your wallets change addresses. Some people have not known this, and looked up their transaction on a public blockchain, and believed that some bitcoin was sent out to an aggressors address, but in truth, it was their own change address.FirmwareInstalling the firmware yourself on the gadget is best practice, but outside the scope of this guide. There are instructions here by Coinkite.ConclusionThis short article revealed you how to use a ColdCard hardware wallet in a more secure and more private way than advertised– however this post alone is not enough. As I stated at the start, you ought to integrate it with the info provided in “Using Bitcoin Hardware Wallets.”This is a guest post by Arman The Parman. Viewpoints expressed are entirely their own and do not necessarily reflect those of BTC Inc or Bitcoin Magazine.
“When setting PIN-1 or PIN-2, you can choose 2-6 digits for each PIN.You will then be provided with the choice to produce a brand-new wallet or “import existing” (restore a wallet). Keep in mind if you ever want to “export” a wallet from the device to make a seeing wallet (do not fret if you dont know what that indicates for now), you need to have the appropriate wallet in memory at the time you make the export; either the wallet with no passphrase or a wallet from one of your passphrases.Watching WalletIn previous posts, I discussed how to confirm and download Sparrow wallet, and how to link it to your own node, or a public node. Otherwise, just read on.Install Bitcoin CoreInstall Sparrow Bitcoin WalletConnect Sparrow Bitcoin Wallet to Bitcoin CoreAn option to utilizing Sparrow bitcoin wallet is Electrum desktop wallet, but I will proceed to discuss Sparrows bitcoin wallet as I judge it to be the finest for many individuals.”Name it something pretty: Then click “Create Wallet”We can set up all sorts of wallets from here. Or you may offer the address to a consumer who can use it to pay you.When you use the wallet for the very first time, you ought to get a very little quantity, practice sending it to another address, either within the wallet or back to the exchange, to prove that the wallet is operating as expected.Once you do that, you need to back up the words that you composed down.